Introduction
Arduino is one of the best platforms for beginners to learn electronics and automation. In this tutorial, we will explore how to use a Touch Sensor Module (TTP223) with Arduino. By the end of this project, you’ll be able to control an LED with just a touch, which is a simple but powerful step into touch-based electronics.
What is a Touch Sensor?
A touch sensor detects physical touch or proximity. Unlike traditional buttons, it doesn’t need pressure — just a light touch. The TTP223 touch sensor module is one of the most common and affordable modules used with Arduino.
Operating Voltage: 2.0V – 5.5V
Digital Output: HIGH when touched, LOW when released
Applications: Touch switches, lamps, smart devices, and DIY projects
Components Required
To build this project, you will need:
Arduino UNO (or any Arduino board)
TTP223 Touch Sensor Module
LED (any color)
220Ω Resistor
Breadboard
Jumper Wires
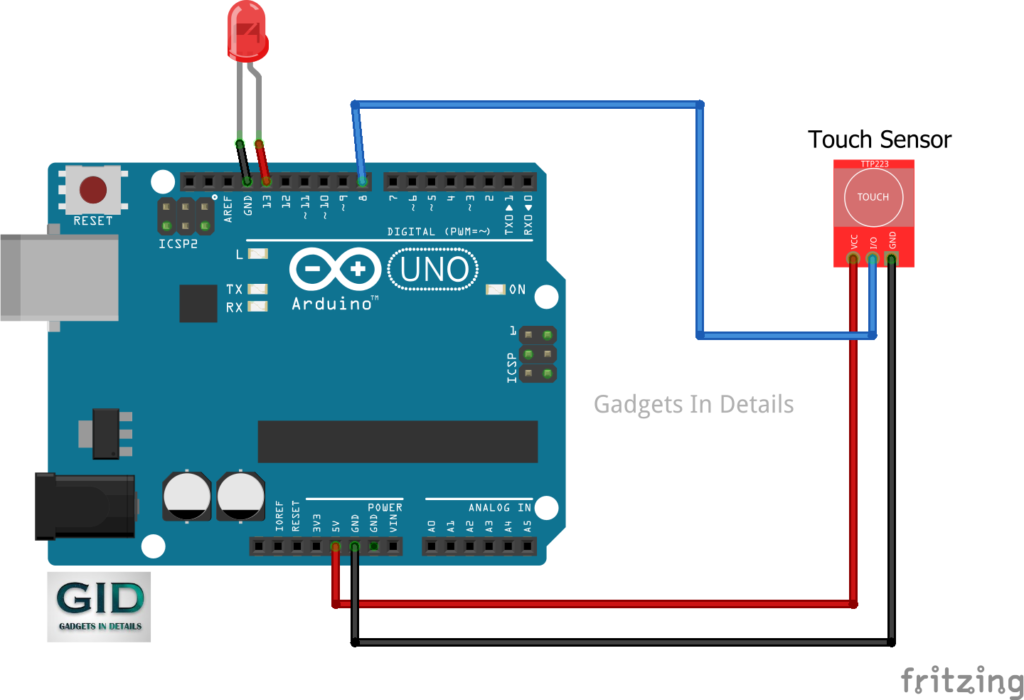
Circuit Diagram & Connections
Here’s how you can connect the touch sensor with Arduino:
-
VCC → 5V on Arduino
-
GND → GND
-
OUT → Digital Pin 8
-
LED → Pin 13 (via 220Ω resistor)
When you touch the sensor, the output pin goes HIGH, and the Arduino can use this signal to turn the LED ON.
Arduino Code
Upload the following code to your Arduino:
//Gadgets In Details
//Touch Sensor interface with Arduino

int touchPin = 8;
int ledPin = 13;
int touchState = 0;

void setup() {
  pinMode(ledPin, OUTPUT);
  pinMode(touchPin, INPUT);
  Serial.begin(9600);
}

void loop() {
  touchState = digitalRead(touchPin);

  if (touchState == HIGH) {
    digitalWrite(ledPin, HIGH);
    Serial.println("Touched!");
  } else {
    digitalWrite(ledPin, LOW);
    Serial.println("Not touched");
  }
}
Explanation:
The sensor output is read on Pin 8.
If touched, Arduino sets Pin 13 HIGH (LED ON).
Otherwise, the LED stays OFF.
Applications of Touch Sensor with Arduino
This simple circuit can be extended into:
Smart home touch switches
Touch-based control for lamps and fans
Security systems
Interactive DIY electronics projects
Conclusion
The Arduino Touch Sensor project is a great way to learn how sensors interact with microcontrollers. With just a few components, you can make your own touch-controlled devices. This project can be the foundation for building smart automation systems in the future.
Want more Arduino tutorials? Check out our other projects and subscribe to stay updated!